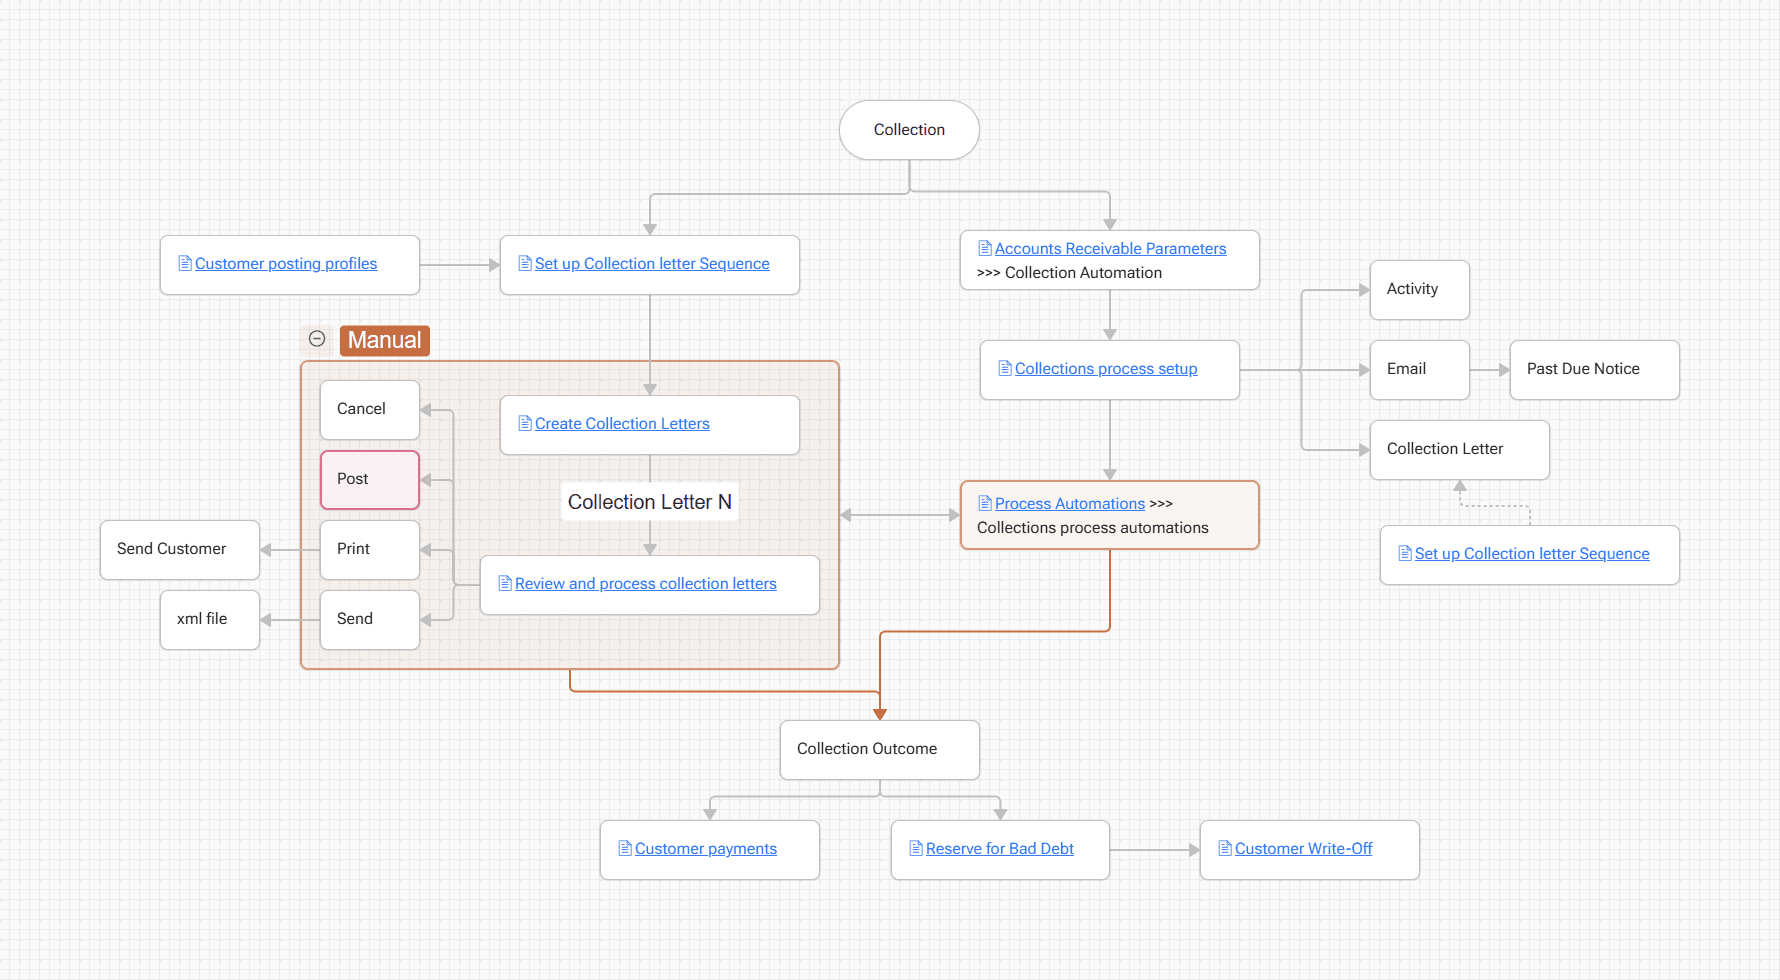
What Is a Collection Letter?
A collection letter is a system-generated notification sent to a customer when one or more invoices have not been paid by their due date. The letter reminds the customer of:
- The amount owed
- The invoice(s) in question
- How overdue the payment is
What makes D365’s approach powerful is the concept of a Collection Letter Sequence — a tiered escalation ladder where the system automatically determines which level of notice to send based on how long the debt has been outstanding.
The Collection Letter Sequence: Escalation by Design
The sequence is the backbone of the entire process. A typical three-tier setup looks like this:
| Level | Purpose | Fee | Minimum Balance | Grace Period (Days) |
|---|---|---|---|---|
| Letter 1 | Initial reminder | $0 | $0 | 2 days past due |
| Letter 2 | Second notice | $20 | $10 | 3 days after Letter 1 |
| Final | Escalation / Legal | $50 | $100 | 15 days after Letter 2 |
You can create multiple sequences tailored to different business scenarios — for example, a more lenient sequence for VIP accounts and a stricter one for new or high-risk customers. Each sequence is then linked to a Customer Posting Profile, which is how D365 knows which sequence applies to which customer.
Configuration: Setting the Stage
Before letters start flying out, there are four key setup areas to get right:
1. Credit and Collections Parameters
Navigate to Credit and collections > Setup > Credit and collections parameters > Collection tab. This is where you configure global behavior, including the critical parameter:
"Ignore payments and credit memos when calculating collection letter code"
- Yes: The system calculates the letter code purely based on invoice aging, ignoring any partial payments or credits. This can cause a mismatch between the header-level and line-level letter codes.
- No (recommended for most cases): All transactions — including payments and credit adjustments — are factored in, keeping the header and line codes consistent.
2. Collection Letter Sequences
Set up your sequences under Credit and collections > Setup > Collection letter sequence. Define each tier’s minimum balance, fee, grace period in days, and which posting account to use for any fees charged.
3. Customer Posting Profiles
Link your collection letter sequences to posting profiles at Accounts Receivable > Setup > Customer posting profiles. This is the bridge between a customer and the escalation sequence that applies to them. You can create different posting profiles for different customer segments, each with a different collection sequence.
4. Collections Agents
Assign collections agents under Credit and collections > Setup > Collections agents. This determines who "owns" the collection relationship with a customer and receives related activities and alerts.
Processing Collection Letters: Two Paths
D365 Finance supports both manual and fully automated collection letter processing.
Path 1: Manual Processing
The manual approach gives you full control over every batch before letters go out — ideal for smaller teams or situations requiring human review.
Step 1: Create Collection Letters
Run the Create collection letters function (Credit and collections > Periodic tasks > Create collection letters). The system evaluates all open customer transactions, compares aging against the active sequence, and determines which customers are due for a new letter — and at which level.
Step 2: Review and Process
Go to Credit and collections > Review and process collection letters. Here you can:
- Review which customers are included and at what letter level
- Manually adjust or exclude specific customers
- Edit letter content where permitted
Step 3: Post
Posting finalizes the letters, records them against the customer account, and triggers any configured fee charges. Only posted letters count when the system calculates whether a customer should advance to the next level.
Path 2: Collections Process Automation
For high-volume environments, manual processing simply doesn’t scale. D365’s Collections Process Automation lets you define a strategy-based schedule that runs automatically, applying collection activities (including sending letters) without manual intervention each cycle.
Where to configure:
- Accounts Receivable > Setup > Accounts Receivable parameters > Collections process automation tab
- Credit and collections > Setup > Collections process setup
- Credit and collections > Setup > Process automations (to schedule the actual batch)
Key automation parameters to know:
| Parameter | What it does |
|---|---|
| Post collection letters automatically | Set to Yes so letters are posted during the automation run — no manual post step needed |
| Enable payment predictions | Uses AI-powered payment prediction to prioritize which customers get early outreach based on late-payment probability |
| Create activities for automations | Creates and closes activity records for every automated step, giving you a full audit trail on the Collections workspace |
| Track step in collections process automation | Introduced in version 10.0.39 — ensures the system steps through every notification level in order, rather than jumping to the most recent applicable step |
Important behavior to understand: When automation runs, letters are generated per customer, not per transaction. This is by design — it consolidates all overdue invoices for a customer into a single, coherent communication rather than sending a flood of individual notices.
Timing note: The automation always runs "as of the current date" and will not repeat on the same day if it has already run successfully. You can rerun it if errors occurred.
How the System Picks the Right Letter Level
This is where many implementations stumble. The system uses the oldest outstanding invoice as the anchor to determine where a customer sits in the collection sequence. Here’s the logic:
- Find the customer’s oldest unpaid invoice
- Compare its age against the grace period thresholds in the active collection sequence
- Determine the appropriate letter level (1, 2, or Final)
- Check whether a letter at this level has already been sent — if not, generate it
The "Track step" parameter (10.0.39+) is especially important here. Without it, a customer who somehow skipped Level 1 might jump straight to Level 2 or Final. With it enabled, the system backtracks and ensures proper sequencing.
The Collections Workspace: Your Command Center
All of this ties back into the Collections workspace (Credit and collections > Collections > Collections). This is where collections agents manage their workload: viewing overdue accounts, seeing which letters have been sent, logging activities, and escalating cases as needed.
When automation is enabled with activity creation turned on, every automated step appears as a closed activity in the workspace — giving agents full visibility into what the system has already done before they pick up the phone.
A Practical Example
Say a customer has an invoice that was due January 1st. Your sequence has a 2-day grace period for Letter 1:
- January 3: System runs automation → Letter 1 generated and posted (no fee)
- January 6: System runs again → checks if Letter 2 threshold is met (3 days after Letter 1 posting date) → not yet
- January 9: Letter 2 generated and posted → $20 fee applied to customer account
- January 24: Final letter generated and posted → $50 fee applied
Each posting advances the customer’s collection letter code, creating a clear escalation trail.
Key Takeaways
- Collection Letter Sequences define your escalation tiers — link them to Customer Posting Profiles to control which customers follow which path.
- The "Ignore payments/credit memos" parameter has a significant impact on how letter codes are calculated — test carefully before enabling.
- Manual processing is appropriate for smaller, high-touch environments; Collections Process Automation scales this for high-volume AR.
- Automation generates letters per customer, not per invoice, keeping communication clean.
- In version 10.0.39+, enable "Track step" to prevent the system from skipping escalation levels.
- The Collections workspace is the operational hub — connect it to your automation activity log for full agent visibility.
1 thought on “How Collection Letters Work in Dynamics 365 Finance”